
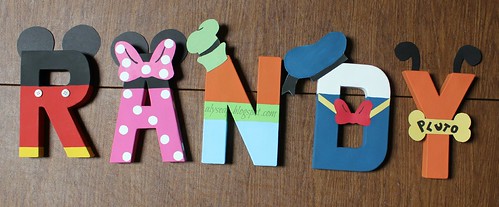
I made these "Mickey Mouse Clubhouse character letters" for my boyfriend's nephews 1st birthday. He is a big "fan" of the television show so I thought it would be a great addition to his cake table. These are the standard characters but if you have a longer name, you could always switch it up. There are also many variations of each character letter, these were just the ones I liked the best from all of the research I did.
First things first, you will need to gather some of the things you will be using for this craft:
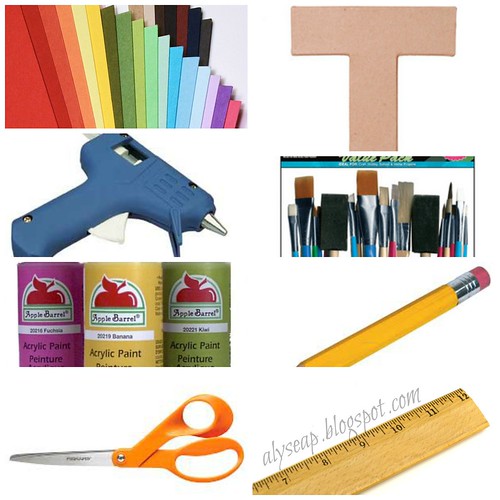
- hot glue gun
- variety pack of paint brushes that include all sizes and foam brushes as well
- pencil
- scissors
- acrylic paint--the ones I got were $0.69 cents each and worked wonderfully
- ruler
- 8" paper mache letters --only craft store that had these by me was "Joanns"
- various colors of card-stock--choose the colors you will need based on the character styles you are choosing. They will be used to cut out the ears, bows, bones and hats.
Before painting, I suggest throwing down a plastic table cloth that can be thrown out or some newspaper to avoid mess. Grab your cup of water to clean each brush, paper towel and foam/plastic/etc. disposable plate for mixing and prepping colors. Each color shown aside from the red and black had to be custom mixed--it is so easy so don't worry :)
I find that the foam brushes worked best for covering large areas. I used the smaller brushes for crevices and detail work.
After your letters are painted (this took me a few days as I let them dry on one side first etc.), now begin decorating them. For this I went online and found outlines of a Minnie Mouse bow, a Donald Duck hat and being that I couldn't find a goofy hat, my boyfriend free-handed it :) Print these out and use them to trace on to your card-stock.
Once they are cut out just glue them onto the completely dried painted letters with your hot glue gun to make your characters come to life :) For any details on the card-stock cutouts, ex: the letters "pluto" on the bone, I just used my very fine tipped paint brush and some black paint. Also, I couldn't find the perfect (did I mention I'm quite the perfectionist when it comes to things like this?) blue for Donald's hat so I painted over the card-stock color I did find and it worked out quite well !
When I took on this craft, I thought it would be way more overwhelming than it actually was, painting and crafts for me in general are rather therapeutic. This could be why I enjoy paint by numbers so much :)
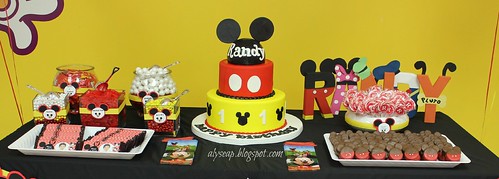
Here is how it turned out on the table. From this angle it looks blocked a little but it looked quite swell--send praises my boyfriend's sisters way, she pulled off a pretty awesome Mickey table ;)
To the Disney in all of us,
xox
Super cool idea. Thanks for sharing!
ReplyDeleteThanks - I was doing fine until I got stuck on the accessories; Card stock, brilliant! Thanks for sharing!
ReplyDeleteDo you happen to remember the colors you mixed/used to make the colors you needed? I am doing this same exact project for my nephews 1st birthday.
ReplyDelete